2 x 4 Drip Edge Flashing 26ga - Sold by Foot
2 x 4 Drip Edge Flashing 26ga - Sold by Foot
Couldn't load pickup availability
2 x 4 Profile | 26ga Metal | 4 in Roof Leg | 2 in Face | Sold by Foot | 8 ft Max Ship Length
2 x 4 Drip Edge Flashing 26ga - Sold by Foot
Help roof water leave the edge cleanly and drop into the gutter with a balanced drip edge profile built for fascia protection, roof-edge coverage, and gutter installation work.
Clear Ordering Note: Sold by Foot, Shipping Length Limited to 8 ft
This drip edge flashing is priced and sold by the foot. Order the total linear footage needed for the roof edge, gutter run, repair area, or fascia transition.
- Sold by foot: the purchase quantity should equal the total linear feet needed.
- Maximum shipped piece length: 8 ft per piece because long metal is costly to package and ship safely.
- Need pieces longer than 8 ft? use in-store pickup or local delivery where available.
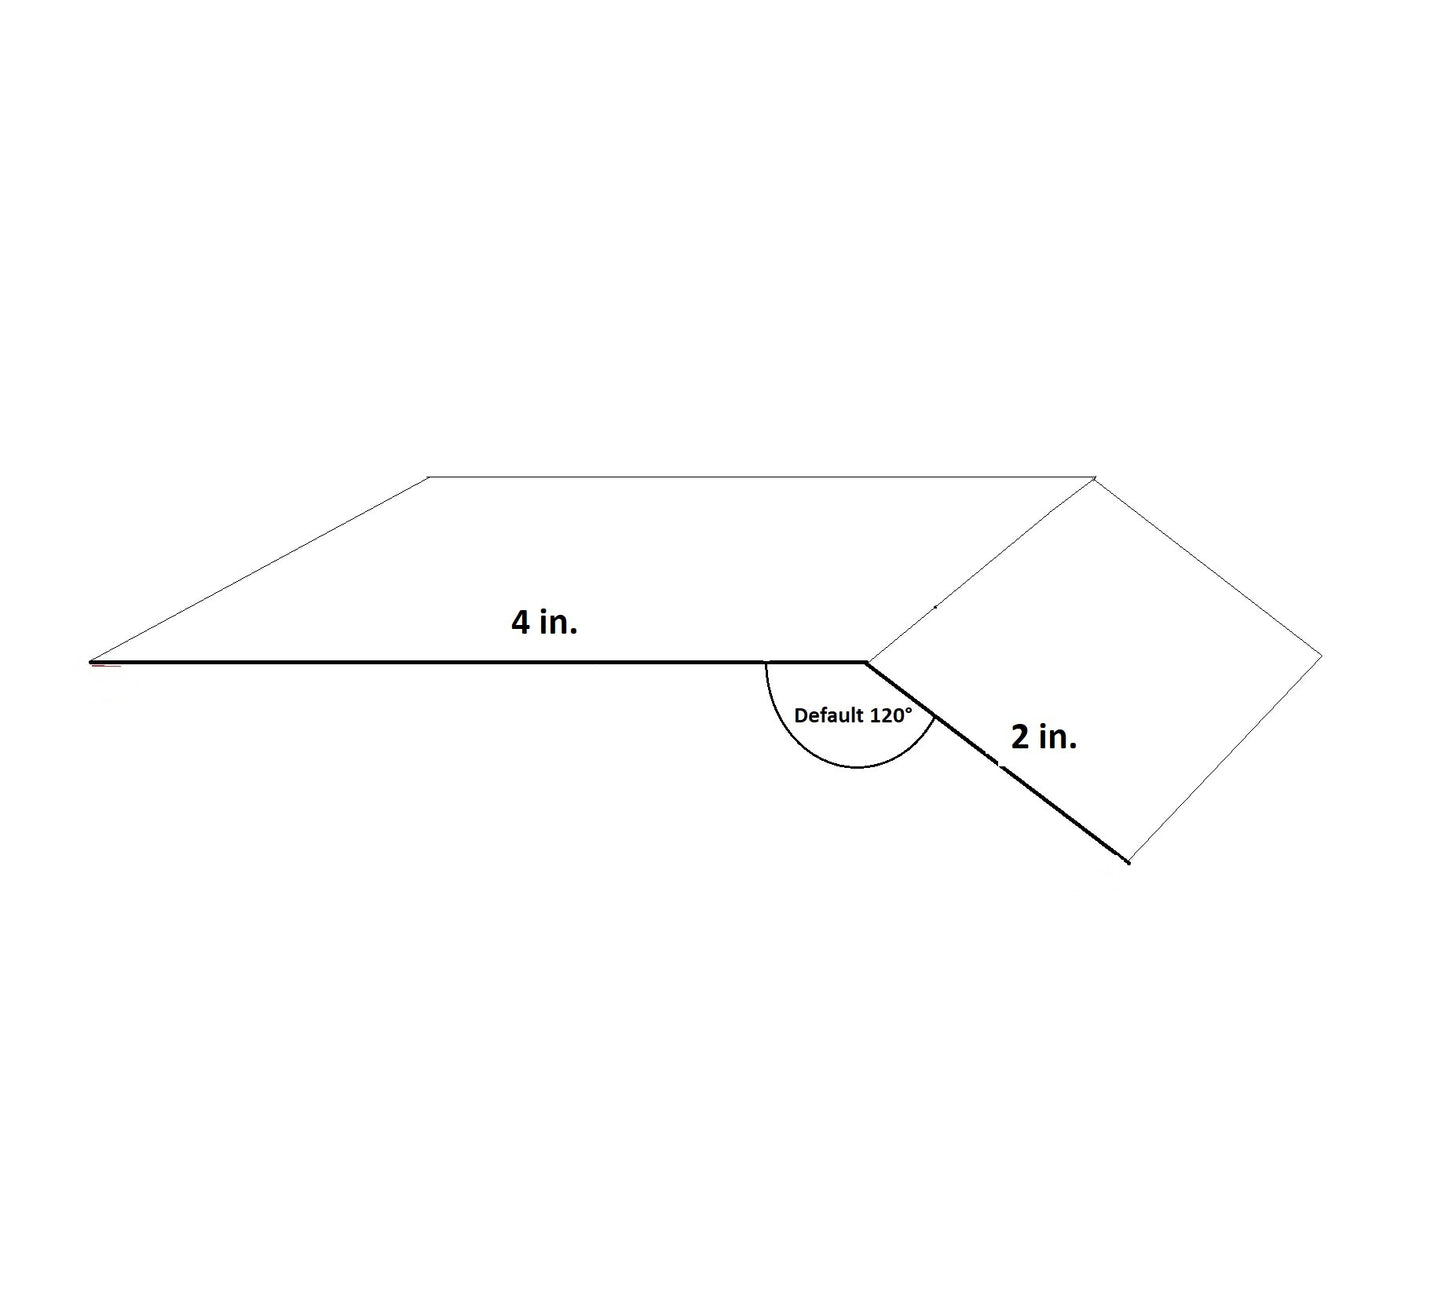
- Profile size: 4 in roof leg with 2 in face.
- Before checkout: confirm footage, piece length, color, gutter position, fascia condition, roof type, and the best fulfillment method.
Key Benefits at a Glance
Gets Runoff to the Gutter
Helps roof water leave the shingle edge cleanly so the gutter can catch the runoff instead of fighting hidden backflow.
Balanced 4 in Roof Leg
Gives more roof-side coverage than compact 2 x 3 profiles while staying easier to fit than longer-leg options on many standard roof edges.
Sold by Foot
Order the footage needed for the actual run instead of forcing the job around a fixed bundle quantity.
8 ft Shipping Limit
Keeps shipped pieces realistic for carrier handling while longer pieces stay available through pickup or local delivery planning.
A Gutter Can Only Catch Water That Leaves the Roof Edge Correctly
A gutter can be pitched, sealed, and hung correctly, but if roof water curls behind the edge, the fascia still gets wet. Missing, short, or poorly layered edge metal can send runoff behind the trough before the gutter ever has a chance.
This 2 x 4 drip edge flashing gives the roof edge a cleaner water break: a 4 in roof leg, 2 in face, 26ga metal construction, and measured-by-foot ordering for cleaner gutter-edge planning.
Built for Cleaner Roof, Fascia, and Gutter Transitions
2 x 4 Drip Edge Flashing is a formed roof-edge flashing profile used where shingles, roof deck, fascia, and gutters need to work together. The profile has a 4 in roof leg, 2 in face, and default 120° bend shown in the profile drawing.
For gutter installers, the value is practical: when water runs behind the gutter, the gutter often gets blamed even when the weak point is the roof edge. A properly planned drip edge, roof-edge flashing, gutter apron, or eave flashing detail helps route runoff where the drainage system can catch it.
This product is sold by the foot. Shipped pieces must be 8 ft or shorter because long flashing is expensive to box, protect, and move through carriers. Longer pieces should be arranged through in-store pickup at GutterAll in Damascus, Oregon or local delivery where available.
Use website chat first to confirm total footage, piece length, color, profile fit, roof-edge condition, and fulfillment option before ordering. Email and phone are available as secondary support options.
| Product | Key Specs |
|---|---|
| 2 x 4 Drip Edge Flashing 26ga - Sold by Foot | Formed roof-edge flashing profile with 4 in roof leg, 2 in face, and default 120° bend shown in the profile drawing; 26ga metal; .019 in thickness; 16+ color options; used for gutter-edge, fascia, and roof runoff control; sold by foot; shipped pieces limited to 8 ft; longer pieces require pickup or local delivery where available. |
Why This Flashing Detail Matters
The roof edge is a small area with a big job. It has to move water from shingles or roof panels into the gutter without soaking fascia, staining trim, or sending water behind the trough.
This 2 x 4 profile is a smart choice when the roof and gutter layout needs a balanced edge detail. It gives installers more roof-side reach than compact 2 x 3 drip edge while keeping the profile practical for many standard residential eaves and rakes.
The strongest order starts with three checks: total footage, maximum piece length, and whether the material is being shipped in 8 ft sections or handled locally in longer pieces.
Contractor Applications
| Application | Why It Helps |
|---|---|
| Gutter installation at eaves | Helps guide roof runoff into the gutter instead of letting water track behind the trough. |
| Fascia protection details | Adds a formed metal transition where fascia boards are commonly exposed to roof-edge water. |
| Gutter replacement work | Lets crews correct old, missing, bent, or undersized edge metal while the gutter is already off. |
| Roof-edge repairs | Useful when drip marks, staining, or backflow show that the edge detail is not directing water cleanly. |
| Measured exterior metal work | Sold-by-foot ordering helps match the material to the actual roof-edge run and chosen piece lengths. |
How the Drip Edge Profile Works
The 4 in roof leg extends under the roof-edge area according to the project condition. The 2 in face runs down toward the fascia and gutter line. Together, the formed profile helps bridge the roof edge so runoff has a cleaner route toward the gutter opening.
Correct layering matters. Underlayment, roofing material, fascia, gutter placement, fasteners, overlaps, and local requirements all affect the final detail. This flashing should be planned as part of the full roof-edge and gutter assembly, not treated as a stand-alone shortcut.
Choose the Right Roof-Edge Metal
This Product: 2 x 4 Drip Edge Flashing
Best when the job calls for balanced roof-edge coverage with a 4 in roof leg and 2 in face.
Compact 2 x 3 Drip Edge
Better for tighter retrofit conditions, smaller roof edges, sheds, outbuildings, or jobs where a shorter roof leg fits better.
Extended 2 x 5 Drip Edge
Better when the roof edge needs extra horizontal coverage and the 5 in roof leg fits the roof system properly.
Key Features
| Feature | Detail | Installer Benefit |
|---|---|---|
| 2 x 4 profile | 4 in roof leg and 2 in face | Provides balanced roof-side coverage for roof-to-gutter transition details. |
| Default 120° bend | Profile angle shown in the drawing | Helps define the transition between the roof leg and face. |
| 26ga metal | Formed metal flashing profile | Gives crews a shaped roof-edge piece instead of improvised flat stock. |
| Sold by foot | Order total linear footage | Helps match the order to measured roof-edge runs and repair sections. |
| 8 ft max ship length | Shipping length capped for long-piece handling | Makes shipping expectations clear before checkout and avoids long-item surprises. |
| Gutter-edge use | Roof, fascia, and gutter transition work | Helps direct runoff toward the drainage system instead of behind it. |
Summary
Choose 2 x 4 Drip Edge Flashing when the project needs a balanced roof-edge metal profile to help move runoff into the gutter and protect the fascia transition. Order by total linear feet, select piece lengths carefully, and keep shipped pieces at 8 ft or shorter.
Key Benefits
- Helps direct roof runoff toward the gutter system
- Helps reduce water tracking behind gutters
- Supports fascia and roof-edge protection details
- 4 in roof leg provides balanced roof-side coverage
- 2 in face helps cover the vertical transition toward the fascia and gutter line
- 26ga metal profile supports professional exterior metal work
- Sold by foot for measured ordering
- 8 ft shipping limit keeps long-piece freight expectations clear
- Longer pieces can be planned for pickup or local delivery where available
- Useful during gutter replacement when old edge metal is exposed
- Helps crews address back-drip, fascia staining, and poor runoff direction
- Pairs with compatible roof, fascia, gutter, and underlayment details
- Can be cut to fit field conditions with appropriate metal tools
- Useful for gutter installers, roofers, remodelers, and repair crews
- GutterAll can help confirm footage and length through website chat
Product Specifications
| Specification | Details |
|---|---|
| Product Name | 2 x 4 Drip Edge Flashing 26ga - Sold by Foot |
| Product Type | Drip edge flashing, roof-edge flashing, gutter-edge flashing, eave flashing, rake flashing, gutter apron style metal |
| Profile Size | 2 x 4 |
| Roof Leg | 4 in |
| Face / Drop | 2 in |
| Bend | Default 120° bend shown in profile drawing |
| Material | 26ga metal |
| Thickness | .019 in |
| Selling Format | Sold by foot |
| Pricing Basis | Price is calculated by total linear feet selected in the purchase area. |
| Maximum Shipped Piece Length | 8 ft per piece |
| Longer Piece Handling | Use in-store pickup or local delivery where available for pieces longer than 8 ft. |
| Color Options | 16+ color options; standard colors may be available when stocked, and special colors may be preordered when needed. |
| Primary Use | Roof-edge, fascia, and gutter transition work |
| Best Use Case | Directing roof runoff toward the gutter and improving coverage at the roof-to-gutter edge |
| Vendor | Montavilla Sheet Metal |
| SKU | GA26902 |
| Weight Reference | 3 lb per 10 ft piece |
| Field Work | May require cutting, fitting, lapping, fastening, and integration with roof edge, fascia, gutter, and underlayment details |
| Not Intended For | Projects requiring a different profile, incompatible roof assembly, unsupported piece length, missing underlayment planning, or another metal type or finish |
| Expected Service Life | Varies by finish, cut-edge condition, installation quality, exposure, fasteners, roof runoff volume, debris buildup, climate, and maintenance. |
Who Uses This Flashing?
Gutter Installers and Cleaning Contractors
- Adding roof-edge metal during new gutter installation or replacement
- Addressing back-drip and fascia staining noticed during service work
- Planning piece lengths, colors, and local delivery for longer runs
Roofers, Remodelers, and General Contractors
- Replacing missing or damaged roof-edge flashing
- Coordinating edge metal with fascia, underlayment, shingles, and gutters
- Improving water routing before exterior finishes are closed up
Capable DIY Homeowners and Property Owners
- Ordering measured flashing for gutter-edge repairs
- Addressing visible drip marks, fascia staining, or water bypassing the gutter
- Confirming whether 8 ft shipped pieces, pickup, or local delivery makes the most sense
Setup and Application Guide
- Measure the full roof-edge or gutter-edge run that needs flashing.
- Choose the total linear footage needed in the purchase area.
- Plan piece lengths before checkout, keeping shipped pieces at 8 ft or shorter.
- Choose pickup or local delivery for longer pieces where available.
- Confirm the 4 in roof leg and 2 in face fit the roof and gutter layout.
- Check fascia condition, shingle overhang, underlayment sequence, and gutter placement.
- Cut the flashing with appropriate metal tools and use gloves to handle sharp edges.
- Dry-fit the flashing before fastening to confirm coverage, alignment, and water path.
- Install the flashing with compatible fastening and lapping methods for the roof-edge assembly.
- After gutter installation, inspect the edge during water testing or rainfall to confirm runoff enters the gutter instead of tracking behind it.
Pro Tip
Before replacing gutters on an older roof edge, check whether the drip edge is missing, too short, bent, or tucked wrong. Fixing the roof-edge detail first can prevent the new gutter from being blamed for water that was already slipping behind the fascia.
Frequently Asked Questions
What is 2 x 4 drip edge flashing used for?
It is used at roof-edge and gutter-edge transitions where a formed metal profile is needed to help direct roof runoff toward the gutter and improve fascia-edge coverage.
How is this flashing priced and sized?
It is sold by the foot. The purchase quantity should match the total linear feet needed. The profile has a 4 in roof leg and a 2 in face.
Can pieces longer than 8 ft be shipped?
No. Shipped pieces are limited to 8 ft because long metal is costly to package and ship safely. Longer pieces should be arranged through pickup or local delivery where available.
Is this the same as every drip edge profile?
No. Drip edge, gutter apron, eave flashing, rake flashing, and other roof-edge metals are not always interchangeable. The right profile depends on roof edge, fascia, gutter placement, underlayment sequence, and local installation requirements.
What is GutterAll's return policy for this product?
GutterAll offers a 30-day return window for unused standard products in original condition. Cut, bent, scratched, installed, altered, custom-length, custom-color, or damaged flashing may not be returnable unless defective. Customers should confirm footage, piece length, color, profile, pickup, delivery, and shipping limits before ordering. Return shipping or return transport is the buyer's responsibility unless the return is due to defect or shipping error. Refunds are processed within 5 to 7 business days after approval and receipt.
What fulfillment options are available?
In-store pickup at GutterAll in Damascus, Oregon, local delivery where available, and shipping are available depending on selected piece length. Shipped pieces are limited to 8 ft. Typical small-order handling is 1 to 2 business days, and transit time is typically 3 to 7 business days depending on destination and carrier.
Cutting, Handling, and Installation Safety Notice
Metal flashing can have sharp edges, especially after cutting. Use gloves, eye protection, safe cutting tools, and proper handling practices.
Roof-edge and gutter work may involve ladders, roof edges, power tools, and fall hazards. Use safe access methods and follow applicable jobsite safety requirements.
Flashing must be integrated with the full roof-edge water-control system. Poor lapping, exposed gaps, weak fastening, incompatible metals, or incorrect profile selection can reduce performance.
Need Help Confirming Footage, Piece Length, or the Right Roof-Edge Detail?
The right order depends on total footage, piece length, shipping limit, roof-edge layout, gutter position, color, pickup, delivery, and whether another flashing profile is needed. Website chat is the fastest way to confirm before checkout.
Fastest Path
Start with website chat for footage, profile, piece length, and fulfillment questions.
Complete the Detail
Add compatible gutters, fasteners, sealant, roof-edge trim, fascia materials, or related flashing separately as needed.
Fulfillment Options
In-store pickup, local delivery, and shipping are available depending on selected piece length. Shipped pieces must be 8 ft or shorter.
Product Summary Box
2 x 4 Drip Edge Flashing 26ga is a sold-by-foot roof-edge and gutter-edge flashing profile with a 4 in roof leg and 2 in face. It helps installers create a cleaner path for roof runoff into the gutter while improving coverage at the fascia transition. Shipped pieces are limited to 8 ft; longer pieces should be planned for pickup or local delivery where available.
Address
GutterAll
19759 SE Sunnyside Rd
Damascus, OR 97089
Hours
Mon-Fri: 7am-4pm PST
Sat: 8am-12pm PST
sales@gutterall.com
Phone